정리 작업중
C# WPF 컨트롤
Xie Yun
2022. 8. 30. 19:47
반응형
화면에 컨트롤을 추가하는 방법
1. 도구 상자에서 컨트롤을 끌어다 놓는 방법
2. 단순히 XAML 파일에 XML 요소를 추가하는 방법
기본 컨트롤
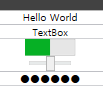
<StackPanel>
        <TextBlock Text="Hello World"></TextBlock>
        <TextBox Text="TextBox"></TextBox>
        <ProgressBar Value="50" Width="60" Height="20"></ProgressBar>
        <Slider Value="5" Width="60"></Slider>
        <PasswordBox Password="Secret"></PasswordBox>
</StackPanel>
멀티미디어 컨트롤
- Image 컨트롤 : 그림을 표시
- MediaElement 컨트롤 : 동영상을 표시
<StackPanel>
        <Image Source="D:\\test.png" Height="150"/>
        <MediaElement Source="D:\\test.wmv" Height="150"/>
</StackPanel>
* WPF의 크기는 장치 독립적 픽셀로 제공된다. 화면 해상도에 관계없이 동일하게 유지된다.
장치 독립적 픽셀은 약 0.5mm이다. 150 크기는 7.5cm를 의미한다.
콘텐츠 컨트롤
- 콘텐츠를 가진 모든 컨트롤이 될 수 있다.
- Button
- Border
- ScrollViewer
- ViewBox
Button 컨트롤
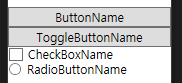
<StackPanel>
        <Button Content="ButtonName"/>
        <ToggleButton Content="ToggleButtonName"/>
        <CheckBox Content="CheckBoxName"/>
        <RadioButton Content="RadioButtonName"/>
</StackPanel>
콘텐츠 컨트롤 응용
- Content 요소 대신, 하위 요소를 콘텐츠 컨트롤에 넣을 수 있다.
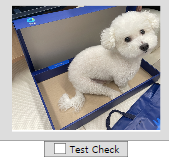
<StackPanel>
        <Button Padding="10">
            <Image Source="D:\\test.png" Height="150"/>
        </Button>
        <Button Width="100">
            <CheckBox>
                <TextBlock Text="Test Check"/>
            </CheckBox>
	</Button>
</StackPanel>
Border. ScrollViewer 컨트롤
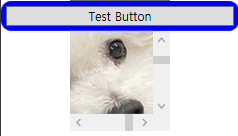
<StackPanel>
	<Border Background="Blue" Padding="5" CornerRadius="10">
            <Button Content="Test Button"/>
        </Border>
        <ScrollViewer Height="100" Width="100" HorizontalScrollBarVisibility="Auto">
            <Image Source="D:\\Test.png" Stretch="None"/>
        </ScrollViewer>
</StackPanel>
ViewBox 컨트롤
- ViewBox는 아래 코드처럼 콘텐츠 컨트롤을 감싼 뒤, Stretch 속성을 변경해 전체 화면 크기를 조절하는 데 사용할 수 있다.
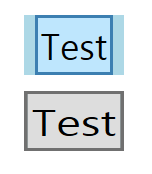
<StackPanel Margin="0,0,0,-199">
        <TextBlock/>
        <Grid Height="60" Width="100" Background="LightBlue">
            <Viewbox>
                <Button Content="Test"/>
            </Viewbox>
        </Grid>

        <TextBlock/>
        <Grid Height="60" Width="100" Background="LightBlue">
            <Viewbox Stretch="Fill">
                <Button Content="Test"/>
            </Viewbox>
        </Grid>
</StackPanel>
* ViewBox 컨트롤을 추가하는 것만으로, 모든 컨트롤들의 화면 크기 조절이 빠르게 가능하지만,
모든 내용의 크기를 조정한다는 단점이 있다. 좀 더 복잡한 크기 조절을 원한다면, layout 컨트롤을 사용해야 한다.
반응형